January 30, 2013

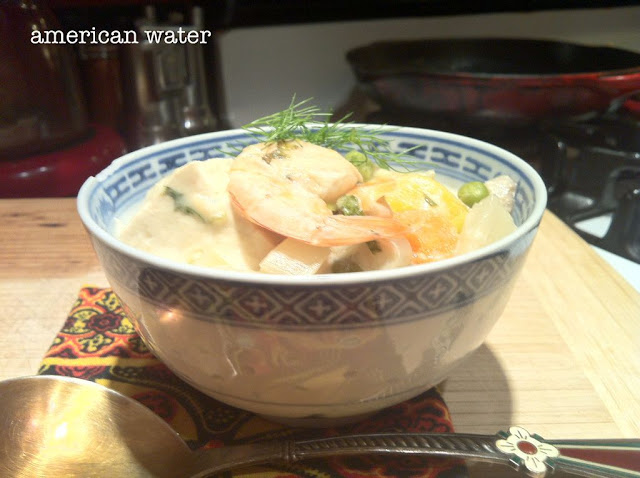
Thai Green Curry

Thai Green Curry with Shrimp & Tofu

In our household, this is a classic standby --  making frequent appearances in our week night rotations. This one is easy & whether ladled over rice or eaten alone as a soup, it is sure to impress. Besides, sometimes experimentation at home is more fun than ordering take out.


ingredients:
1 can of light coconut milk
1 tsp Thai green curry paste (to begin, more to taste up to 4 tsp)
1 tsp fresh ginger, grated
1 clove garlic, minced
1/2 tsp fish sauce
1 pinch freeze dried lemongrass, or one stalk lemongrass, pounded (optional)
3/4 cup frozen peas
1 carrot, very thinly sliced
1/4 fennel bulb, very thinly sliced
1/4 sweet white onion, very thinly sliced
1 bulb baby bok choy, very thinly sliced
18 shrimp, frozen
1/2 block silken tofu, cubed
1/2 lime, cut into wedges
kaffir leaves (optional)
handful of basil, chopped
handful of cilantro, chopped
yield: 3 servings

1. in a large pot, combine the coconut milk, Thai green curry paste, ginger, garlic, fish sauce & lemongrass over low-medium heat. simmer for about 10-15 minutes until flavors blend. taste & adjust to desired heat level, adding more curry paste in .5-1 tsp increments.

2. add in the vegetables & blanch them - the key here is to not overcook the vegetables. crisp vegetables retaining their flavor make this soup particularly refreshing.

3. as the vegetables cook, add in the shrimp & tofu. once the shrimp turn pink, turn off heat source. squeeze lime wedges into the curry, cover & let stand for several minutes.

4. serve with fresh squeezed lime wedge, kaffir leaves, basil & cilantro.
January 29, 2013

Feature Ingredient: Cauliflower

Roasted Cauliflower with Shallots & Garlic

Is it just me or does anyone else think cauliflower is going to be the new brussels sprouts? I am beginning to see them on menus everywhere around town. And for good reason. Cauliflower can be put towards a good variety of uses & they soak up accompanying flavors in a really convincing way. During last week's cold spell, we made pulled pork in the slow cooker and this made for a quick & easy side.


ingredients:
1 head of cauliflower, cut into florets
1 shallot, sliced
2 cloves garlic, minced
1.5 tsp olive oil
1/2 tsp crushed red pepper flakes
1/2 tsp salt
fresh ground black pepper, to taste

1. pre-heat oven to 400F

2. in a large bowl, toss together the cauliflower, shallots, garlic, olive oil & spices until the cauliflower is evenly coated.

3. line a baking sheet in a single layer with the florets & bake for 15-20 minutes.

4. the floret sides in contact with the baking sheet brown nicely, 1/2 through the cooking process, rotate the florets to even the browning. these are ready when the florets are tender to the touch of a fork.

5. serve immediately - these are best eaten warm.

Leftover Suggestions:

Roasted Cauliflower Soup
if you happen to have any florets left over, these make for a great soup base. in a blender combine cauliflower florets with chicken or vegetable stock & a splash of cream. cook over low-medium heat on the stove top to warm throughout.

Roasted Cauliflower, Chickpea & Whole Grain Salad
with my leftovers, I threw together a quick salad for lunch the next day. combine florets with a 1/2 can chickpeas & 1/2 cup cooked whole grain of your choosing (quinoa, wheatberries or bulgar). add a glug of olive oil and more salt & cracked red pepper to taste. 

January 24, 2013

Brown Bag (vegan!) Lunch

Kale Salad with 
Red Kidney Beans, Pine Nuts & Tahini Dressing
{original recipe from your daily vegan}

I was steadfast in thinking that kale is a garnish, not something one would eat, until our friend Shannon shared this game-changing recipe with me. The amount of tahini in this recipe may appear to be too much, but you need a healthy dose of fats here to help digest the kale - the first time I made this recipe I was sparing, with regret.


ingredients:
1 bunch of kale, stems removed & chopped into bite size pieces
1 15 oz can red kidney beans, drained & rinsed
1/3 cup pine nuts
1/2 cup tahini
2 cloves garlic, minced
1.5 tbsp apple cider vinegar
1 lemon, juiced
1/8 cup water, or more as needed
salt & pepper, to taste

1. wash the kale & dry it thoroughly with paper towels or a salad spinner (this part can be a pain, but is necessary as the dressing will not stick to wet leaves). 

2. remove large stems & tear apart the kale into bit sized pieces along the vein lines.

3. put kale into a large bowl. then mix in the kidney beans & pine nuts.

4. in a separate bowl, whisk together tahini, garlic, vinegar, lemon juice & water. add more water as necessary, a little bit at a time, to achieve a uniform, runny consistency. 

note: tahini tends to separate and you will need to mix to combine the oils with the solids on the bottom - consider this part a good arm toning exercise!

5. toss the dressing with the kale & let sit for at least 15 minutes before serving so the acids from the dressing can break down the kale a bit.

January 23, 2013

The Duck Chronicles

A Whole Duck. And Then Some.

On a recent whim, we bought a whole duck. The results unfolded over many days, some more repeat-worthy than others. This (rather long!) post features some highlights from our multi-day, multi-meal duck experiment.


Butchering a Duck

The first order of proceedings was to butcher the duck. Andrei conquered this job with a high level of finesse for a rookie, should you require -- a visual from Jacob Burton over at Stella Culinary.

These scissors proved an indispensable tool for this task. We are still convinced this was our best wedding present & the most useful household item we currently own - highly recommend.


 Fried Duck Innards

This part is perhaps not for the faint-hearted, but proved a fun cooking diversion for Andrei. 


ingredients:
1 heart
1 liver
1 gizzard

1. cut a piece of duck fat from the cavity opening

2. render the duck fat over low heat until the pan is coated with fat

3. fry the innards in rendered duck fat until browned on all sides & cooked through

not for you? alternatively, you could use the duck liver to try a homemade duck liver pate.


Seared Duck Breast

Even if you are not working with a whole duck, seared duck breast makes for an easy & cheap dinner and tends to be more readily available in local grocery stores than you may imagine.

Unfortunately, this part of our duck adventure was admittedly the least successful. The seared breast turned out just fine, but the reduction sauce pairing was simply a mess. Untethered ambitions & misguided experimentation got the best of me in this round. Next time around, I will look to these inspiration sources here, here & here. Let me know if you have any more success than we did!


 Duck Confit
{original recipe from Secrets of Slow Cooking}

Confit is one of the oldest ways to preserve foodThe French have a particular reputation for this technique & duck confit features prominently in their traditional cassoulet. Confit of duck is most often prepared from the legs. The meat is salted & seasoned with herbs & slowly cooked submerged in its own rendered fat. 

This was truly delicious. So much so, that my bold ambitions to make rillettes, duck confit quesadillas & duck confit pasta gave way to eating this as a snack straightaway. The rich, juicy & dark meat perhaps feels extra rewarding after the 2+ day prep process.

ingredients:
1 shallot, minced
1/2 bunch fresh thyme sprigs, finely chopped
2 duck legs with thighs
2 cups rendered duck fat

1. sprinkle salt in a shallow glass or plastic container, followed by 1/2 of the shallots & 1/2 of the thyme. lay the duck legs fat side up in one layer over the salt mixture. then sprinkle more salt, and the remaining shallot & thyme over the legs. cover & refrigerate for up at least 1 day, up to 2 days. 

2. rinse off the duck legs & pat dry with paper towels (frankly, this part remains a wee confusing for me, but alas, can't argue with the results). place them in a slow cooker in one snug layer. pour in the fat to cover the duck legs.

note: rendering duck fat can be a lengthy process to yield enough to cover, you will want to take that into account, as we were a bit surprised by how long it took.


3. cover & cook on a low setting for 5-6 hours, until the meat can be easily pulled from the bones.

4. using tongs, remove the duck legs from the fat & take the meat off the bones.

5. the meat can be used right away or stored for future use. 

to store: put the meat in an airtight container & cover completely with fat. keep covered in the refrigerator for up to 3 weeks, making sure to recover the meat with fat after removing any for other uses.


Spinach Salad with 
Duck Confit, Sauteed Shallots, Mandarin Orange Segments, Chopped Hazelnuts & Roasted Garlic Vinaigrette


Before we finished all of the confit, I did manage to pull together this delicate, yet robust, brunch offering. This is a confident dish to present to crowds of any persuasion. Once the duck confit is prepared, all the hard work is behind you on this one.


ingredients:
1 shallot, diced
1 tsp olive oil
4 cups spinach
4 mandarin oranges, segmented
2 oz hazelnuts, crushed
1.5 tsp olive oil
1 tsp white wine vinegar
2 cloves garlic mashed, preferably roasted 
.5 tsp strong mustard
salt & pepper, to taste
4 oz duck confit

1. lightly saute the shallot in olive oil, until the shallot begins to brown a bit

2. layer the spinach with the mandarin oranges & hazelnuts, gently fold in the cooked shallots

3. in a separate bowl, whisk together the olive oil, vinegar, garlic, mustard and salt & pepper, until you reach a uniform consistency & tiny bubbles form

4. toss the olive oil dressing with the spinach salad

5. serve the duck confit over the dressed spinach salad beds

note: i like to roast a head of garlic when i have the oven on for other uses - but garlic carries a big smell, so make sure it is something that can withstand the aroma of roasted garlic


Duck Stew

The carcass. You know this was coming, didn't you? Just when we thought the confit could not be surpassed, this happened. This is so simple that one may not think to serve at a dinner party, but perhaps that is the point -- the simpler, the better. 


duck carcass
12 brussels sprouts, halved or whole
1 vidalia onion, quartered
3 medium sized carrots, coarsely chopped
8 small red potatoes, halved or quartered
3 cloves garlic, coarsely chopped
1/2 tsp black peppercorns, ground
1/2 tsp white peppercorns, ground
1 tsp cumin seeds, ground
1 tsp fenugreek powder (optional)
1/2 tsp coriander, ground
3 bay leaves
1/2 bottle of white wine
2 tbsp rice vinegar

1. line a good sized dutch oven pot with the duck carcass & arrange the brussels sprouts, onions, carrots,  potatoes & garlic around the duck. 

2. sprinkle the spices on top & pour white wine, vinegar & water to cover 

3. on stove top over low heat, simmer until the remaining meat is falling off the bones. it should be very fragrant & vegetables should be very soft. we cooked for at least an hour or so.

4. remove all bones, bay leaves & any whole spices.

5. enjoy!

note: any remaining liquid would make an excellent base for a risotto

 Duck Fat Brussels Sprouts

And last, but most certainly not least, the gift that keeps on giving - duck fat, making the entire endeavor worthwhile. Keep any leftover rendered fat in an airtight container in the refrigerator. It should be soft enough to slice with a butter knife & can be used for a variety of purposes, including eggs. And potatoes. And vegetables. We served these brussels sprouts with a whole roasted chicken, which in retrospect feels a perverse mixing of poultry products...

ingredients:
1 inch cube duck fat
12 brussels sprouts, halved
1 shallot, diced
1 clove garlic, minced
salt & pepper, to taste

1. render the duck fat over low-medium heat in a non-stick pan

2. saute brussels sprouts, shallot & garlic in the duck fat until the leaves of the brussels sprouts begin to brown & curl a bit, they should be soft against the touch of a fork.

3. season with salt & pepper, to taste


January 21, 2013

Wintering Menu

Braised Beef with Spinach Salad


This braised beef recipe honors simple, quality ingredients with tested braising techniques. This is one you put in the oven & forget about, until the smells draw you back to the kitchen (plenty of time for a round of scrabble in between). The resulting beef is so rich, you will want to keep portions light & sides refreshing. This spinach salad made a nice match & was easy to pull together while the beef cooled off a bit. A slice of crusty white bread could be used to sop up all the savory drippings.


Beer-Braised Beef Shanks

ingredients:
2 bone-in beef shanks, or according to desired serving number
salt & pepper to cover shanks
1 tbsp olive oil
1/4 vidalia onion, finely chopped
1 carrot, thinly sliced
6 brussel sprouts, thinly sliced
3 cloves garlic, finely chopped
6 oz amber ale (we used ommegang rare voz)

1. pre-heat the oven to 325F

2. season the beef shanks on all sides with salt & pepper

3. bring olive oil into a large dutch oven pot to medium heat & then add beef shanks. be careful to not crowd the pot.

4. sear meat, rotating as necessary, until all sides have taken on a rich brown color. then remove cooked meat & set aside.

5. in the drippings from the meat, saute onions, carrots, brussel sprouts & garlic. stir frequently over medium heat & cook until onions have reached a caramel-like brown color. be careful to not scorch your ingredients.

6. once vegetables have browned, add the ale. using a wooden spatula scrape up any browned bits from the bottom of the pot.

7. return the meat to the pot, with juices & braising liquids. add more ale as necessary, but do not submerge the meat. 

8. bring the liquid to a simmer, then cover & cook in a 325F oven until meat is falling off the bone to the light touch of a fork. 

note: about 45 minutes after you place the meat in the oven, you may want to check that there is enough braising liquid - add more if there is less than an inch of liquid remaining. on the other hand, if you have too much sauce as the meat finishes, you will want to reduce the sauce. remove the meat & any vegetables from the sauce, skim fat off the surface, then simmer down the sauce until it is thick enough to coat the back of a wooden spoon (about 15-20 minutes). return the meat & any vegetables to the pot to heat through.


Spinach Salad with 
Sauteed Pears, Shaved Parmesean & Pine Nuts

ingredients:
1 tsp olive oil
1/2 bosc pear, thinly sliced
1/4 vidalia onion, thinly sliced
2 cups baby spinach
shaved aged parmesean
handful of pine nuts
1 tsp olive oil
1 tsp white wine vinegar
1 tsp mustard
honey, to taste
salt & pepper, to taste

1. warm olive oil over low heat in a non-stick pan

2. add pears & onions & cook until pears caramelize & onions brown a bit

3. in a medium sized bowl, combine cooked pears & onions with spinach, several shaves of aged parmesean & a handful of pine nuts. note: the cooked vegetables will cause the spinach to wilt a bit - if you prefer the spinach to maintain its raw shape, wait to combine ingredients until pears & onions have cooled completely. 

4. in a separate bowl, whisk together olive oil, vinegar & mustard. add honey, salt & pepper to taste.

5. fold olive oil dressing into the spinach

6. serve immediately on the side of the beef shanks & a slice of crusty white bread

January 18, 2013

Baby, Its Cold Outside!

Hot Whiskey with Honey, Lemon & Cloves

Curl up on your couch & beat the cold with one of these - its like medicine for the soul.


ingredients:
lemon wedges
handful of whole cloves
4 oz whiskey or rye
spoonful of honey
yield: 2 servings

1. fill a kettle with water & wait for the telltale whistle to indicate its readiness

2. spike lemon wedges with whole cloves

3. pour whiskey into each glass

4. fill each glass with hot water

5. spoon honey over the lemon wedge

6. let the lemon wedge steep for 1-2 minutes, as you would with a tea bag & then remove (i find this prevents the hot toddy from becoming sticky sweet)

7. repeat & enjoy!

January 17, 2013

Lately, Snacking On: Macadamia Nuts

Lemon Greek Yogurt 
with Pomegranate Seeds & Macadamia Nuts

Lemon flavored Greek yogurt provides a zesty base. Pomegranate seeds lend tartness. And the macadamia nuts bring a telltale richness - reminiscent of the holiday season without the guilt.   

January 15, 2013

Gumbo

Andouille Sausage, Chicken & Shrimp Gumbo
{slightly adapted from Cook & Be Merry}

The ingredient list on this one is a bit intimidating in length & cost, but well worth it. For us, this recipe braved new culinary terrain, including the creation of a roux base & the addition of spices only towards the very end of the cooking process. Serve this up over rice for a big crowd or better yet make with the intention of the leftovers. This gumbo tastes even better the next day, once the flavors have had a chance to sit together over night.


ingredients:
1/3 cup vegetable oil
1/3 cup all purpose flour
1 large white onion, chopped
1/2 yellow bell pepper, chopped
1/2 red bell pepper, chopped
4 cloves garlic, chopped
1/8 tsp cayenne 
1/3 cup dry white wine
handful fresh thyme, minced
2 bay leaves
1 14 oz can diced tomatoes with juice
1 8 oz bottle claim juice
1/2 can chicken broth
2-3 andouille sausage links, cut into coins
4 chicken tenderloins, cubed
3 dashes of Worcestershire sauce
2 tbsp total ground coriander seeds, white peppercorns, black peppercorns, in more or less equal parts
1 tsp paprika
1/5 tsp mustard powder
4 green onions, diced
18 frozen shrimp (it is more convenient to eat if these are peeled in advance, but it enhances the flavor to cook in shells)
yield: 4 generous servings

1. heat oil in large Dutch oven over medium heat until very hot, but not yet smoking. add flour & stir constantly until mixture is dark brown & fragrant.

2. add onion, peppers, garlic & cayenne powder to the roux and cook until onions begin to brown. stir frequently, the onions will release liquid as they cook, so there should not be a need to add more liquid.

3. add wine, thyme & bay leaves. stir until the wine absorbs. 

4. add tomatoes, clam juice, broth, sausage & chicken. lower heat & simmer until chicken is cooked through. the acids from the wine & tomatoes will smell overpowering. 

5. as the chicken cooks the gumbo will taste a bit flat, presenting a blank palate for spices & making this gumbo truly come alive. add the Worcestershire sauce & spices. it will seem like a lot, but we found the flavors to absorb nicely. taste & adjust.

6. in the last few minutes of cook time, add the green onions & shrimp. simmer until the shrimp cook through & turn opaque. 

7. turn off & let stand for at least 5 minutes before serving.

8. serve with rice if desired & garnish with parsley or more minced green onions.

January 09, 2013

Breakfast of Champions

Multi-Grain Tortilla with 
Avocado & Sauteed Zucchini and Onion

Breakfast is the most important meal of the day, or so they say. But the usual morning offerings can leave a bit to be desired when eaten day in & day out. Have a perfectly ripe avocado on hand? Why not exchange your usual bowl of cereal or oatmeal for this? 


ingredients:
1 multi-grain tortilla (i like mission brand)
1 tsp olive oil
1 small zucchini
1/4 white onion
1/2 avocado
chopped cilantro
hot sauce of your choosing
salt & pepper to taste
yield: 1 serving

1. warm both sides of the tortilla in a cast iron skillet over low heat. when using a cast iron skillet the tortilla will absorb a range of flavors that lend a bit of depth to the taste.

2. warm the olive oil in a non-stick pan. meanwhile, cut the zucchini into thin coins & dice the onion. then add the vegetables to the olive oil & saute until onions brown a bit.

3. smash the avocado into the warmed tortilla with the back of a fork. sprinkle with salt & pepper to taste.

4. layer the sauteed vegetables over the avocado & garnish with chopped cilantro and the hot sauce of your choosing.

January 07, 2013

Lately, Snacking On: Corn Muffins

Crab & Jalapeno Corn Muffins

This is the season where get togethers often involve large, spicy pots of chili. These corn muffins are an excellent match for a hearty chili. These are also interesting & flavorful enough to eat on their own right - add a smear of chive cream cheese & serve with a side of greens to complete the meal. Honestly, these were so good, I even ate them for breakfast the next day.


ingredients:
1 cup corn meal
1 cup flour
1/2 cup sugar
3 tsp baking powder
1 tsp salt
1 can crab meat 
1/2 can jalapeno peppers
1/2 vegetable oil
2/3 cup milk
2 eggs, beaten
yield: 12 muffins

1. preheat oven 400F

2. grease muffin tins with stick of butter

3. combine corn meal, flour, sugar, baking powder & salt in bowl.

4. mix oil, egg & milk. fold in crab meat & jalapeno.

5. add mixture to dry ingredients. mix until batter is uniform in consistency. 

6. pour corn meal batter into greased muffin tins, filling until 2/3 full.

7. bake for 15-20 minutes, or until a toothpick comes out clean.

January 05, 2013

Resolution Worthy

Shrimp & White Beans


This time of year is full of self-reflective commitments & promise. However, New Year's goals should not mean diet deprivation & sacrificing flavor. This meal is balanced & filling, but above all it is delicious. Together, these recipes yield two generous servings, or three when served with a crusty French Baguette & leafy greens on the side.

Lemon Garlic Shrimp with Roasted Broccoli 


ingredients:
2 dozen frozen shrimp, defrosted
1 broccoli crown, cut into florets
1 shallot, coarsely chopped
1/2 lemon, juiced
1 tsp olive oil
2 garlic cloves
salt & pepper to taste

1. pre-heat the oven to 400F.

2. toss the shrimp, broccoli & shallots with the lemon, olive oil & garlic. line on a baking sheet, then sprinkle with salt & pepper to taste.

3. roast the shrimp & broccoli for about 10 minutes. 

note: I parboiled the shrimp first, however they were a bit overcooked in the end. I think letting them defrost a bit & roasting them straightaway with the broccoli is the better alternative.

Panko-Crusted White Beans with Rosemary & Garlic


ingredients:
1 can Cannellini white beans
2 tsp olive oil, divided
1/2 sweet white onion, diced
1 clove garlic, pressed or finely minced
4 inch fresh rosemary sprig, minced
~2/3 cup panko
salt & pepper to taste

1.  rinse beans in a colander, let drain. 

2.  warm 1 tsp olive oil in a pan. add onions & garlic + a pinch of salt. cook until onions begin to brown.

3.  combine white beans, rosemary & panko in a shallow dish. gently fold white bean mixture into onions. add more oil as needed to prevent the beans & panko from sticking to the pan. 

4. cook until the panko has browned a bit & formed a loose crust around the beans.